In today’s era when sustainable development has become not just a buzzword but a necessity, gardeners are playing a leading role in this direction. One of the most effective, beneficial, and surprisingly simple ways to make your garden more green is to install a rainwater harvesting system. By adopting sustainable landscaping practices, you can turn your backyard into an eco-friendly oasis that remains green even during the scorching summer months.
Every time it rains, hundreds of gallons of fresh, chlorine-free water flow through your roof. Without a collection system, this roof runoff picks up pollutants and rushes into the storm drains. By capturing this water, you aren’t just saving money on your utility bill; you are providing your plants with the “soft” water they crave while protecting your local watershed from the “pollutant soup” of urban environments.
In this detailed article, we will tell you in detail about the “why” and “how” of creating a professional level DIY rainwater harvesting system, which will be useful for your garden for years to come.
Why Every Gardener Needs a Rain Barrel
Before you start assembly, let’s find out why this project is worth giving your Saturday afternoon time to. Understanding the science behind rainwater harvesting can help you make the most of it.
- Superior Plant Health: Municipal tap water is often treated with chlorine, fluoride and artificial minerals, which accumulate in the soil and eventually change the chemical composition of the soil. Rainwater is naturally soft, pH-balanced and contains a small amount of organic nitrate; which is a key component of fertilizer that plants can immediately absorb.
- Significant Water Conservation: During the extreme months of summer, outer irrigation can cost up to 40% of average household water use. Rainwater harvesting reduces this demand, giving you a green garden without any worries or expenditure.
- Effective Stormwater Management: By managing water flowing from the ceiling you can stop the soil erosion around your foundation. Uncontrolled drift can come in the basement and the valuable upper soil can be destroyed.
- Emergency Water Supply: In the event of a water shortage, pipeline breakdown, or local drought, storing 55 to 110 gallons of water can be the difference between a flourishing vegetable farm and a wilting crop.
Essential Tools and Materials
No special engineering skills are required to create a rainwater collecting barrel, but it is important to have the right spares to make it anti-leakage and safe. The use of high quality spares is necessary for its long-term durability.
The Shopping List
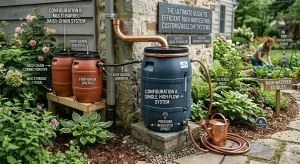
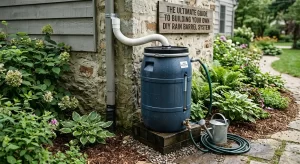
- The Barrel: A 55-gallon edible plastic drum (usually blue or terracotta colored).
- Food-grade is crucial: Avoid barrels that have previously contained industrial lubricants or toxic chemicals. Look for traces of high-density polyethylene.
- The Spigot: A 3/4 inch brass or strong plastic hose bibb. Brass is preferred because of its durability and resistance to abrasion.
- The Overflow: A 1 inch PVC mail adapter or second hose bibb to deal with fast rain.
- The Screen: A fine mesh to prevent mosquito breeding and keep organic waste out.
- Washers & Sealant: Rubber O-rings and high quality waterproof silicone caulk or plumber tape.
- The Base: Strong concrete blocks, cinder blocks, or pressure-treated 4×4 wood logs.
The Tool Box
- Power Drill: Wired or 18V wireless
- Hole Saw Bits: Specifically 1 inch and 2 inch sizes
- Hacksaw or Tin Snips: For accurate adjustment in your existing downspout
- Wrench & Screwdriver: To tighten internal nuts and spigots
- Safety Gear: It is mandatory to wear goggles and strong gloves when punching holes in plastic.
Step-by-Step Construction Guide
Step 1: Clean and Prepare the Barrel
If you’ve taken a used food-grade barrel, the first step is to clean it thoroughly. Leftover sugars or edible oils can cause algae to thrive. Take a mixture of warm water, white vinegar and a small amount of biodegradable dish soap. Rub the insides with a brush with a long handle and continue to wash until the water is absolutely clean.
Step 2: Create the Intake Port
You need a reliable way to deliver water from the drain to the barrel.
- The Open-Top Method: Cut a large circular hole in the lid and with the help of a bungee cord or screw put a finely forged screen on it. A large amount of liquid can be inhaled from it, but the screen will have to be cleaned repeatedly.
- The Professional Diverter: Use the “Downspout diverter” kit. You need to make a special hole in the side of the pipe and another in the downspout. A flexible hose connects the two. This is the best standard for managing water flowing through the roof as it automatically sends the water back to the drain when the capacity of the barrel is full.
Step 3: Install the Spigot for Gravity Flow
The spigot should be placed about 3–4 inches from the bottom of the barrel. Placing it too high leaves too much “dead water” (water that can’t be accessed), which becomes heavy and stagnant.
- Make a slightly smaller hole with the thread of the faucet so that it fits well.
- Apply a good amount of silicone sealant on the threads.
- Tighten the tap. If there is a removable lid in your barrel, put your hand inside and protect it from lock-nut and rubber washer so that it gets completely sealed.
Step 4: The Overflow Valve Logic
If you’re not using a diverter, your barrel will overflow during heavy rain.
Make a hole near the very top of the barrel.
Install mail-to-mail hose adapter.
Attach a length of garden hose to this valve to direct excess water at least 5 to 10 feet away from your home’s foundation. This prevents the “puddling” effect that causes basement leaks.
Step 5: Leveling the Base and Gravity Pressure
Water is surprisingly heavy. A full 55-gallon barrel weighs approximately 460 pounds. If the base isn’t level, the barrel can tip, causing property damage or injury.
- Clear a flat area beneath your downspout and remove any sod.
- Lay down a 2-inch bed of leveled gravel to ensure proper drainage and prevent the blocks from sinking over time.
- Stack concrete blocks to raise the barrel at least 12–15 inches off the ground.
- Pro Tip: Raising the barrel is essential because gravity-fed water systems require height to create pressure. The higher the barrel, the faster your watering can will fill and the better your hose will perform.
High-Impact Features for a “Pro” System
To take your DIY project from a simple bucket to a high-performance rainwater harvesting system, consider these additions:
- The “Daisy Chain” Setup: One barrel fills up quickly in a storm. Connect multiple barrels in a series using a “linking kit” at the bottom. This allows you to store 110, 165, or even 220 gallons of water from a single downspout.
- The First Flush Diverter: The first few minutes of rain wash the most dust, bird droppings, and pollen off your roof. A “first flush” device captures this initial contaminated water and diverts it away, leaving only the cleanest water for your barrel.
- Custom Aesthetics: Blue barrels can be an eyesore. Use “Krylon Fusion” paint to match your home’s siding, or builds a simple cedar trellis around the barrel to hide it behind climbing plants like jasmine or ivy.
- Drip Irrigation Compatibility: If your garden is downhill, you can connect your barrel directly to a low-pressure drip irrigation system. This provides a slow, steady “soaker” effect that is perfect for vegetable rows.
Crucial Maintenance and Safety Tips
Mosquito Prevention and Algae Control
Standing water is a breeding ground for mosquitoes and algae.
- Screens: Ensure every opening is covered with fine mesh.
- BTI Tablets: Use “Mosquito Dunks”. These are organic, non-toxic tablets that kill mosquito larvae but are completely safe for plants, pets, and wildlife.
- Light Blocking: Algae needs light to grow. Painting your barrel an opaque color (if it’s translucent) will stop algae in its tracks.
Winterization Protocol
If you live in a climate where the ground freezes, you must winterize.
- Drain the barrel completely before the first hard frost.
- Disconnect all hoses and the spigot (or leave it in the ‘open’ position).
- Store the barrel upside down to prevent water from collecting and freezing inside, which can crack the plastic.
- Re-attach your original downspout extension to ensure winter snowmelt is directed away from the house.
Understanding Rainwater Harvesting Laws
While generally encouraged, always check your local municipal codes. Some states have specific rules regarding the amount of water you can collect or the types of containers used. Most modern “Green Codes” fully support sustainable landscaping through rain barrels.
Safety Warning: Non-Potable Water Uses
Never drink rain barrel water. This is strictly for non-potable water uses. It may contain pathogens from bird droppings or chemicals from asphalt shingles.
- Safe for: Lawns, flower beds, trees, and shrubs.
- Edibles: If using on a vegetable garden, apply water to the base of the plant (the soil) to avoid direct contact with the leaves. Always wash your harvest thoroughly with potable (tap) water before eating.
Summary of Key Benefits
- Ultra Cost-Effective: Create by itself costs less than $50, while retail models often cost more than $180.
- Eco-Friendly Footprint: This directly reduces the amount of storm water runoff that puts immense pressure on the city’s infrastructure.
- Superior Hydration: It doesn’t contain chlorine at all and is at the perfect pH level for plants that prefer acidic climates like azaleas and blueberries.
- Scalable Infrastructure: Start with one barrel and increase the number of pots as your gardening ambitions grows.
The Bottom Line
Making a barrel to collect rainwater in the house is a project that homeowners can happily do over the weekend. This is a unique “triple benefit”; you save on electricity bills, your garden gets high-quality water that increases its yield and you take a concrete step toward protecting your local environment.
With the right materials and a little hard work, you can turn your home’s drainage system into a life-giving resource. Buy a barrel from food distributors around you today and get your arrangements ready before the next rain.


